- Published on
Upgrade your commit pipeline with Husky & Conventional commits
- Authors
- Name
- Edgar Gago Carrillo
- @gagocarilloedgar


Upgrade your commit pipeline with Husky & Conventional commits

So, you've seen things like this in pull requests, merges and in general in git histories:
(someimage): ...
(someimage): upgrade
(someimage): delete stuff
(someimage): update something
(someimage): ...
And to be fair, all of us have probably done it.
Well, not anymore. If you are as lazy as I am, you'll forget in about a minute of the things that you need to do to properly finish a task (things like writing a proper commit message).
To avoid that I tend to automat tasks so I don't forget and also I make those automation task hard to avoid (this is a cool trick learned from the. book: Atomic habits.
Conventional commits
I personally like the way conventional commits structure the commit message, it's clear and you can easily identify the type of change you've created.
For those who don't know conventional commits. It is a framework / convention of strcuturing commits messages. Ir provides the ground rules for you and your team to have a clear way of generating commit messages.
Having a clear and fix structure around your commits can help a lot your team, you and it can be integrated with change logs to be even more powerful. The basic structure around conventional commits is the following:
<type>[optional scope]:
<description> [optional body]
[optional footer(s)]
For those who want to read more about here you have the link to the official website: Conventional commits
Setting up our environment
Let's get started then.
This configuration work for already running projects as well as for new ones. But, if you already have husky setup in your environment I'd recommend to remove it, remove node_modules and go from there. Here you have the commands:
# Remove husky
npm uninstall husky
#or
yarn remove husky
# Remove node_modules
rm -rf node_modules
# Install packages again to have a fresh start
npm i
#or
yarn install
Lets then add the packages we needs:
- Commitizen: https://github.com/commitizen/cz-cli
- CommitLint: https://medium.com/dottech/mejorando-los-mensajes-de-git-commit-con-husky-y-commitlint-7bddf6ab22c2
- Devmoji: https://www.npmjs.com/package/devmoji?activeTab=readme
- Husky: https://www.npmjs.com/package/husky
- Lint-staged: https://www.npmjs.com/package/lint-staged
- Prettier: https://prettier.io/
- ESLint: https://eslint.org/
# using npm
npm i -D @commitlint/cli @commitlint/config-conventional devmoji husky
# using yarn
yarn add @commitlint/cli @commitlint/config-conventional devmoji husky -D
We'll add all the packages as development dependency because we don't need any of those inside our main dependencies.
Once we have our packages let's setup husky.
# Setup
npx husky install
# Set commit lint
npx husky add .husky/commit-msg 'npx commitlint --edit $1' && npx husky add .husky/commit-msg  'npx --no -- commitlint --edit ${1}'
Now we need to add the commit lint config that will tell our pipeline what kind of linter to run.
Add a new file in your root folder with the following name .commitlintrc.json:
{
  "extends": ["@commitlint/config-conventional"]
}
Now to make it even better we can add emojis to our commits automatically using devmoji:
# This will add get our message and add an emoji according to the type of commit.
npx husky add .husky/prepare-commit-msg "npx devmoji -e"
The emojis are set according to conventional commit types. Here you have the list of working types that will be added to your commit messages:
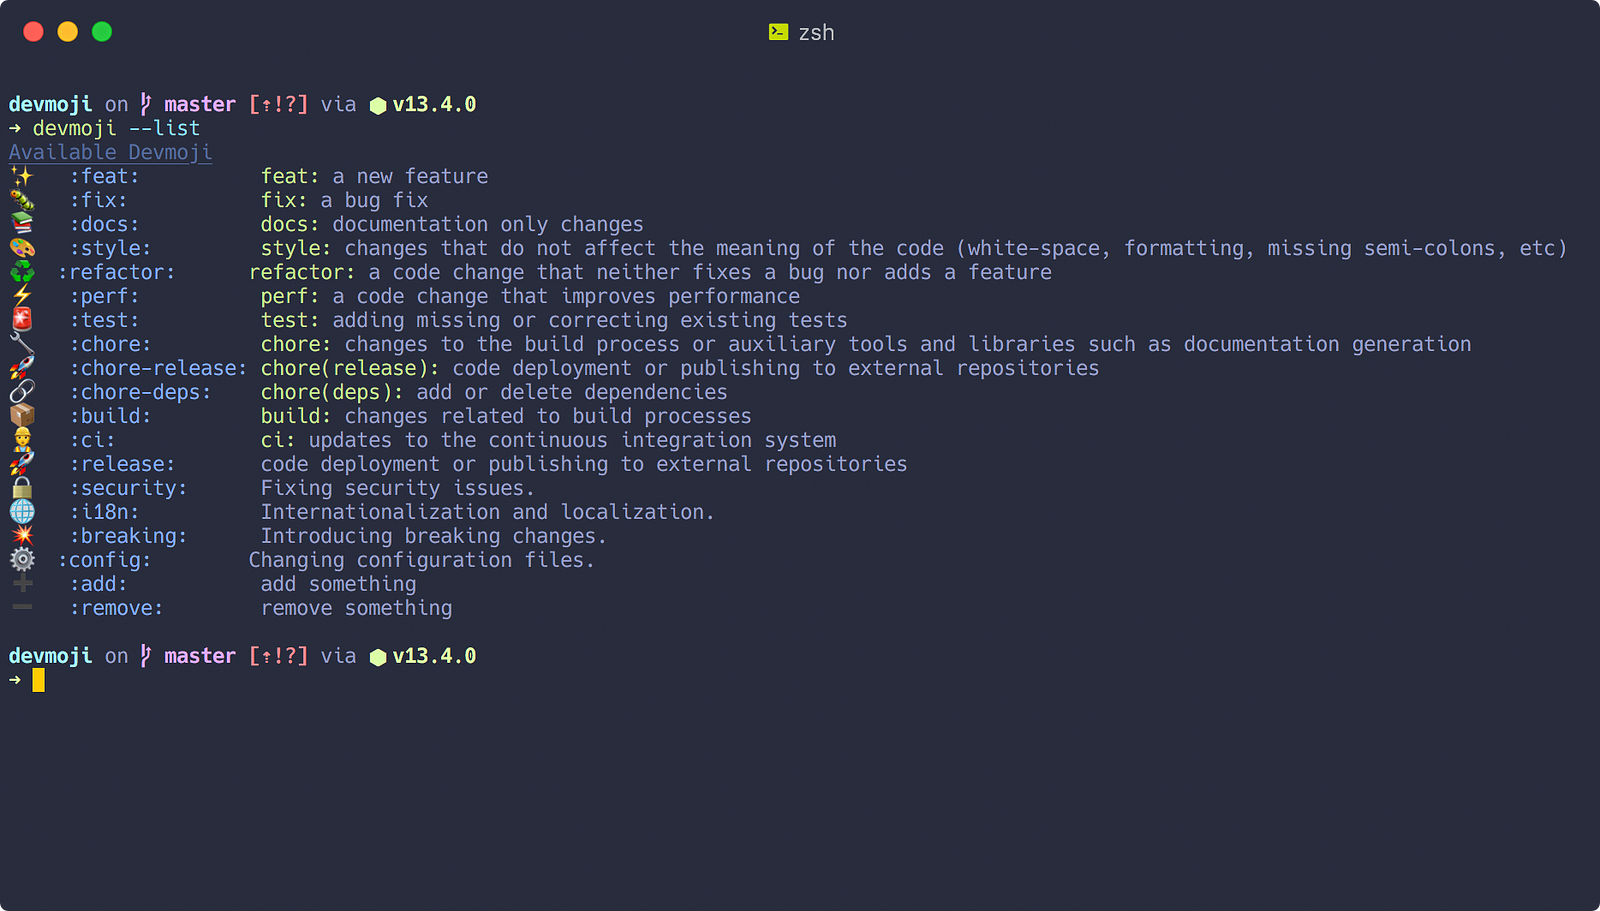
Now the commit lintern is all set. The last step to ahve a well rounded commit pipeline is to add Prettier and ESLint.
ESLint & Prettier config
First let's start the packages
# using npm
npm i -D lint-staged eslint prettier
# using yarn
yarn add lint-staged eslint prettier -D
We'll use lint-staged to set the different steps we want to run before committing the changes.
Once installed, let's add the pre-commit husky command and the lint-staged pipeline.
# Add lint-staged to the husky commands
npx husky add .husky/prepare-commit-msg "npx lint-staged"
Now we modify our package.json with the following:
...
"scripts": {
   "lint": "eslint --fix",
   "prettier": "prettier --write"
},
...
The scripts above will allow us to fix any kind of format errors according to our prettier and eslint configuration. Then we'll also include the lint-staged pipeline inside the package.json as well:
...
"lint-staged": {
    "./src/**/*.ts": [
      "npm run lint",
      "npm run prettier"
    ]
  }
Here we are simply adding the eslint and prettier scripts we0ve previously defined. Inside the lint-staged I am only targeting the source folder and typescript files. Here you can add more languages or folders modifying the pattern. For example for my Front-end projects I use:
...
"lint-staged": {
    "./src/**/*.{js,jsx,ts,tsx}": [
      "npm run lint",
      "npm run prettier"
    ]
  }
And with that you are done. You can safely add, and commit without worrying about messing the styles of your project or your commit history.
Bonus points
So, you don't want to run:
git commit -m "type<scope>: message" -m "more description here"
I have something for you then: Commitizen. This tool helps you and your team make the commit process easier with and interactive step-by-step process.
To set commitizen up add it to your dependencies and a script to make it even easier:
# Install
npm install -g commitizen
# npm
commitizen init cz-conventional-changelog --save-dev --save-exact
# yarn
commitizen init cz-conventional-changelog --yarn --dev --exact
And add the following script:
...
  "scripts": {
    "commit": "cz"
  }
That's it! You are good to good. I Hope you've enjoyed and it was useful.